A straight razor is more than steel and scales. Used well, it delivers a close, comfortable shave that feels deliberate, not rushed. It asks for attention, rewards patience, and ages with you if you care for it. The straight razor sits within a wider world of classic wet shaving, from double edge razor gear to modern single blade designs, and understanding the differences helps you choose what fits your face and your habits. This guide distills what matters, from first strokes to long-term maintenance, without romanticizing the learning curve or glossing over the practical trade-offs.
What a Straight Razor Offers That Others Don’t
The appeal of a straight razor begins with control. You set the angle, pressure, and stroke length. There’s no plastic hinge deciding how the blade meets your beard, no clog-prone cartridge head hiding what’s happening. When dialed in, a straight razor can clear tough growth in fewer passes, which often means less irritation, especially for coarse or curly hair.

It is also cost-stable over time. A well-honed blade, stropped before each shave and touched up on a stone now and then, will outlast disposable razor heads and most safety razor blades many times over. The long view looks even better if you enjoy the process. That said, up-front costs are real: a quality straight razor, a strop, a decent shaving brush, and a puck of shaving soap can total more than a year of cartridge refills. You pay once, then you maintain.
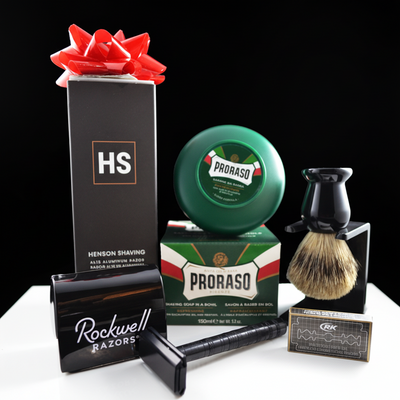
There is a tactile pleasure as well. The sound of whiskers popping. The way lather moves under a hollow-ground edge. The weight and balance that quiet the wrist. These details often turn an obligation into a ritual. If ritual sounds too precious, you may prefer a safety razor like the Merkur 34C or a rigid single blade design such as a Henson razor. Those give a taste of the same control with less training.
Anatomy and Steel: What to Buy First
A straight razor looks simple, but small differences matter. Blade width is measured in eighths of an inch. A 5/8 or 6/8 is the most versatile for beginners, narrow enough to navigate under the nose and wide enough to hold steady with lather on the face. Wider blades in the 7/8 and 8/8 range feel authoritative and shave beautifully, but they punish sloppy angle control and can feel bulky around tight contours.
Grind determines how the blade flexes and sings. Full hollow grinds are lively and give excellent feedback, which helps you learn. Near-wedge grinds feel stiffer and plow through thick stubble with fewer vibrations. If your beard is dense and wiry, a half or quarter hollow can split the difference.
Steel quality trumps brand hype. Most reputable makers heat treat to a hardness in the low 60s on the Rockwell scale, which holds an edge well without becoming brittle. Vintage razors from Sheffield, Solingen, Thiers, and American makers such as Geneva often represent superb value if the geometry is intact and corrosion is minimal. Look for clean bevels, symmetrical grinds, and a straight spine. If you cannot judge that yet, buy from a vendor who hones each razor and stands behind the edge.
A Shavette deserves separate mention. It looks like a straight but takes replaceable half double edge razor blades or proprietary blades. Barbers rely on them for hygiene when regulations forbid shared blades. They are sharper out of the wrapper than many freshly honed straights and offer a low-cost way to try the handling. They also punish pressure and angle mistakes more quickly because the blade edge is extremely keen and has no rounded “shoulder” from repeated stropping. If you want the straight razor experience with less maintenance, a Shavette works, but understand it is less forgiving.
Prep: Where Great Shaves Begin
Good prep is the cheapest performance upgrade. Hair softens with water and time. A hot shower followed by immediate lathering works for most. If you cannot shower first, press a warm, wet towel to your face for one to two minutes. Do not rush this step if your stubble is thick or your skin is sensitive.
Build a dense, slick lather from a reliable shaving soap or cream. The method matters more than the brand. A badger or synthetic shaving brush helps you hydrate the soap and paint it evenly. Aim for yogurt-like consistency with sheen. If it bubbles like dish foam, you need more product or less water. Map your grain with your fingertips while lathering. Most beards grow down on the cheeks, outward on the jawline, and upward on the neck, with swirls around the https://knoxzhwz844.theglensecret.com/edge-razor-upgrades-from-cartridges-to-a-double-edge-razor Adam’s apple. Commit your map to memory; it dictates your strokes.
A quick note on oils and pre-shave products. They can help some skin types, but they also clog strops and make hands slippery. Use them if they solve a problem. Otherwise, a clean face, warm water, and good lather suffice.
Technique: Angle, Tension, and Pace
Set the spine of the straight razor a coin’s thickness off your skin. That’s roughly 10 to 15 degrees. Too steep and you scrape. Too shallow and the blade skips. Keep the blade moving and the skin flat. Your other hand is not idle. It stretches the skin in the direction opposite your stroke. Proper tension makes whiskers stand and reduces the chance of a catch.
Start with with-the-grain passes on the cheeks, then the sideburns, then the flat areas of the neck. Short strokes help while you learn. Wipe the blade on a folded towel or rinse in warm water between strokes, keeping the pivot dry. The upper lip and chin require patience. Take the upper lip with light pressure and shallow angle, then re-lather and revisit. On the chin, stretch the lower lip over the teeth and shave in small sections. If the blade chatters, reduce angle and shorten the stroke.
Two passes are enough for a close daily shave, with-the-grain followed by across-the-grain. If you chase baby-smooth, consider a third pass against the grain only where your skin tolerates it. Many long-time straight razor shavers skip ATG on the neck to avoid ingrowns. You do not need to prove anything to your mirror.
Nicks happen. A styptic pencil or alum block closes them quickly. If you see weepers along the jawline, your angle creeped too high. If you feel tugging, the edge may be dull or your lather too dry. Record what you changed from the last good shave. A mental checklist keeps you honest.
Stropping: The Daily Edge
Stropping aligns and refines the microscopic burr that forms during shaving and honing. Do this before every shave, not after. Post-shave, your blade carries moisture and microscopic debris that you want to rinse and dry, not embed into your strop.
Hang the leather strop with the hardware end fixed. A second fabric component, often linen or canvas, sits in front of the leather. Run the blade spine-first along the fabric side first to clean and warm the edge, then switch to leather. Keep the strop taut, not bowed. Lay the spine down first, then the edge. Lead with the spine and flip on the spine to avoid rolling the edge. Go light. Imagine wiping lather, not scraping paint. Thirty to fifty laps on leather is plenty for daily maintenance. If your edge still feels harsh, a few laps on a pasted strop loaded with chromium oxide or diamond spray can restore smoothness, but do not overdo abrasives. They remove steel.
Common mistakes include lifting the spine during the flip, which rounds the bevel, and pressing into the leather to chase a feeling of contact. Pressure is the enemy. Let the leather kiss the edge.
Honing: When and How Often
With good stropping, a straight razor can go weeks to months before needing a hone. The calendar matters less than feedback. When you feel more tugging despite solid lather and angle, or you need to work harder for the same result, it is time.
If you are not ready to learn honing, send it out. A reputable honer will return a shave-ready edge that sets a baseline for your stropping. When you decide to learn, start with a finishing stone in the 10K to 12K range to refresh an edge that is still basically sound. Tape the spine if you want to preserve polish and geometry, though opinions differ. Use light strokes, water only, and count your laps to maintain symmetry.
If the edge is truly dull or chipped, you need a progression that includes a bevel-setter around 1K, then mid-grits like 3K to 5K, then 8K, then a finisher. Many shavers stop at 8K and finish on pasted strops; others prefer natural stones like coticules or Japanese finishers for a specific feel. Coticules often produce a buttery edge, while hard synthetics give high keenness with a bright bite. You will learn your face’s preference over time.
Aftercare: Skin and Steel
Rinse the face with cool water. An alum block swiped lightly can highlight technique errors. If it stings everywhere, your angle or pressure needs work. Follow with a splash or balm that suits your skin. Alcohol-based splashes disinfect and tighten but can dry. Balms soothe and moisturize. If you suffer from ingrowns, favor gentle exfoliation between shaves and avoid aggressive ATG passes.
For the razor, rinse in warm water, wipe the spine and tang dry, then gently pat the blade between folded tissue from spine to edge. Do not wipe the edge along its length. Open the scales and let the razor air dry fully. In humid climates or if you store the razor for more than a week, rub a drop of light oil on the blade faces and spine. Camellia oil works well, as does mineral oil. Avoid leaving the razor in the bathroom if your shower turns it into a steam room.
Straight Razor vs Safety Razor: Honest Trade-offs
A safety razor is a simpler path to great shaves, and a good one deserves respect. The Merkur 34C, for example, is a reliable, medium-aggressive double edge razor that pairs well with a wide range of double edge razor blades. It has just enough weight to let gravity do the work and a head design that encourages a controlled angle. If you prefer minimal maintenance, a safety razor with quality double edge blades offers superb value. Rotate blades from brands with different grinds and coatings until you find the sweet spot for your beard. For rigid, ultra-stable geometry, the Henson razor family, including Henson Shaving Canada options for buyers in that market, uses tight tolerances and a fixed angle to flatten the learning curve. Many users with sensitive skin find that setup practically foolproof.
A straight razor surpasses these when you want maximum customization and are willing to pay with time. It can be kinder to skin because you control the blade exposure with micro-adjustments. It generates less waste than disposable razor cartridges, and once you own honing and stropping, there is nothing to throw away other than the occasional worn strop.
On pace, a safety razor wins before you master the straight. After a few months with a straight razor, the time gap shrinks. I can clear a two-day beard in roughly the same time with either tool, but only if my straight is in top shape. If I am traveling, a double edge safety razor and a small tuck of razor blades beat a straight razor for convenience. A Shavette splits the difference, but airline security and local regulations vary. Always check rules before you pack any Razor or blades.
First Month Roadmap: Building Competence Without Bloodshed
- Shaves 1 to 5: Work only on the cheeks with the straight razor. Finish the neck and chin with a safety razor or a disposable razor you trust. Focus on angle and skin tension. Keep strokes short. Shaves 6 to 10: Add the neck, still with the grain, using a very shallow angle. Skip the chin and upper lip unless your lather is perfect and your hand steady. Shaves 11 to 20: Introduce across-the-grain passes where your skin tolerates them. If irritation spikes, revert to WTG for a few shaves and evaluate stropping. Shaves 21 to 30: Attempt the chin and upper lip with deliberate, small strokes. Touch up with a safety razor if needed. Begin to sense when the edge is fading and whether your stropping is maintaining it.
This cadence prevents frustration. You earn the full-face shave by stacking small wins.
Common Pitfalls and How to Fix Them
If your shaves feel hot and sandpapery afterward, you are either using too steep an angle or repeating too many passes without re-lathering. Reduce angle, lighten pressure, and never dry-shave touch-ups. If your lather vanishes mid-pass, load more soap and add less water. Thick stubble consumes thin lather fast.
If the blade stalls, check your skin stretch. Use your off hand, your jaw, or your neck muscles to create a flat plane. Turn your head to change the grain relationship if needed. On the neck, tilt your chin up and toward the opposite shoulder, then pull down on the skin beneath your stroke to lengthen the hair and keep the surface taut.
If your edge deteriorates quickly, the strop may be contaminated or your technique flawed. Inspect the leather for nicks and residue. Clean with saddle soap if needed, then condition lightly. Practice the stropping flip slowly, watching the spine stay in contact. A dozen slow, perfect laps beat fifty sloppy ones.
Respecting the Ritual Without Overcomplicating It
There is a temptation to collect gear rather than practice. A single, well-honed straight razor, a dependable strop, a serviceable shaving brush, and a modest soap are enough. Fancy scales and rare stones do not improve a shaky angle. Decide when to enjoy the ritual and when to be efficient. On a travel day or before a big meeting, you might reach for a safety razor. On a Sunday morning with coffee cooling on the counter, the straight razor can transform a chore into a craft.
If you smoke cigars, you al